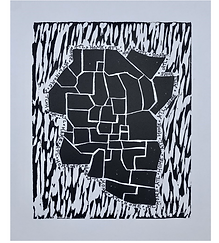
Contemporary Art: Mapping the Landscape of Identity
Kelly R. Rollocks
CTA2: Curriculum in Teaching Art
Dr. Heidi Powell
September 13, 2020
Lesson Title: Mapping the Landscape of Identity
Grade Level: 7
Estimated Completion Time: 5 Class Periods
Overview
Students will examine the landscapes in the following artworks:
-
Zarina Hashmi, Atlas of my World
-
Paula Scher, U.S.A. Extreme Weather 2015
-
Barrett Lyon, The Opte Project
-
Juan Downey, Map of America
Students will then create their own abstracted map inspired by the contemporary artists shared. Specifically, students will use similar printmaking processes as Zarina Hashmi, and incorporate text as inspired by Paula Scher. In response, students will create their own abstracted maps, making connections to their own identities.
Enduring Ideas/Essential Questions
Enduring Idea: Mapping place and identity with contemporary landscapes
Essential Questions:
How do I enrich my art making with personal meaning?
How do I make art that connects to a place?
How do I represent places in a meaningful way?
How do I create abstract artwork?
How do I incorporate text into an artwork?
How can a landscape be created in an unconventional way?
National or State Learning Standards
*Gwinnett County Public School District-AKS*
7FV.A.1: visualize and generate ideas for creating works of art
7FV.A.1.a: generate ideas by using mental and visual imagery
7FV.A.5: reflect on, revise, and refine works of art considering relevant traditional and contemporary practices as well as artistic ideation
7FV.A.5.a: discover, define, and solve visual problems through experimentation with ideas, materials, and techniques
7FV.C.8: reflect on the context of personal works of art in relation to community, culture, and the world
7FV.C.10.a: write responses to works of art through various approaches
7FV.D.11: develop personal artistic voice through connecting uses of art within a variety of cultural, historical, and contemporary contexts
Lesson Objectives
-
Students will design an abstracted map indicative of personal identity.
-
Students will explain a personal connection to a location with a map.
-
Students will apply personal text into an artwork.
-
Students will compare and contrast the contemporary artworks shared
-
Students will create a map of their identity with linocut printmaking
Tools and Materials
This is a linocut printmaking lesson. Students will need a linoleum block, brayer, printing ink, carving tools, barren, quality paper, charging plate, marker, tape, and a pencil. It is helpful to cover tables with newspaper, and have extra paper towels on hand. It is also helpful to have a drying rack. Students will also need to conduct some visual research. This can be facilitated with technology, atlases, or using the school library resources.
Teacher: Access to a projector to show and discuss contemporary art references. Ability to demonstrate printmaking process using the above materials.
Introduction
The teacher will begin the lesson using guiding questions for introduction from Appendix A. After discussing, most students will likely have conventional landscapes in mind. Share the selected works from Zarina Hashmi, Paula Scher, Barrett Lyon, and Juan Downey. Guide students through discussion using the guiding questions for viewing work from Appendix A.
Have students prepare for the project by participating in an automatic writing exercise. This means, students will list any word that comes to mind about the topic. Topics include home, current place, or ethnic background place. Give students one minute to list as many words as possible connecting to the selected topic. Conclude by having students title the list with the place they were referencing.
Demonstrate project process: For the example, I chose the topic of home. The words listed in the automatic writing exercise were: home, Atlanta, Georgia, Gwinnett, Lilburn, Tucker, family, growth, peaches, mountains, rivers, lake. I will later incorporate these words into my art, similar to Paula Scher. First, I will reflect on the place in mind, for me it was Atlanta. I will begin by researching some map images of Atlanta, and creating my own sketches. When I have decided on a representation, I will draw the map on a 5”x7” sheet of paper. This will allow me to erase or modify as needed. I will use my pencil to cover the back of the page in a solid layer of graphite, and then tape the paper, graphite side down, on by 5”x7” linoleum block. I will use a pen to trace over my drawing, so I can see which areas have been traced. The graphite on the back of the paper will transfer onto the linoleum block. Now, I will make selections about positive/negative space. I will use a sharpie to color in areas of the block I will later carve, these areas will not carry ink. Now, I will demonstrate the use of carving tools- making sure to show how to safely handle by only working outward from the body. Following the carving, I will demonstrate how to charge a brayer, and make a print using a barren. I will allow the ink to dry, before using a sharpie to add text from the automatic writing process.
Procedure
-
Participate in automatic writing activity
-
Reflect on the topic, and decide what place you will focus on
-
Research and sketch maps of the place
-
Decide on a representation, and draw it on a 5”x7” piece of paper
-
Cover the reverse side in a solid layer of graphite, and tape to the linoleum block
-
Use a pen to trace over the drawing, this will allow students to see what parts have been traced
-
The graphite will transfer to the linoleum block. Remove the drawing from the linoleum
-
Using a sharpie, make selections about positive/negative space. Shade in areas to be removed
-
Using carving tools, work away from the body to remove selected areas
-
Charge a brayer with printing ink, and cover an even layer of ink over linoleum block
-
Place paper on top of linoleum block, and use a barren in circular movements to get an even print
-
Remove paper and allow to dry
-
Use a sharpie to incorporate some text from the automatic writing activity
-
Participate in reflection
Distribution and Clean-Up
Students will complete the automatic writing, and visual research in sketchbooks. Sketchbooks are kept and maintained by each individual student.
Teacher will maintain a materials station to assist in material distribution, monitoring, and providing feedback to student at checkpoints in the process. Students bring the work to the materials station and check in with the teacher at the below checkpoints.
-
Checkpoint 1: 5”x7” sheets of paper, and require students to show their selected representation to receive the paper
-
Checkpoint 2: linoleum blocks, pens, tape, and sharpies. Students will be required to show their drawing, and the teacher will check the coating of graphite on the back to receive materials
-
Checkpoint 3: students return sharpies and pens, and sign out a carving tool.
For printmaking sessions: Stations will be set up prior to class by the teacher. Each station should have a table covered in newspaper, with extra paper towels available. The station should include printing ink, a charging plate, paper for printing, and a barren.
Clean Up: Select 1-2 students to be in charge of each checkpoint/station. Selected students will return materials to each checkpoint, and/or clean each station at the end of class.
Closure
Display student work. Possible options include, utilizing a bulletin board, taping to a wall or dry erase board so that each piece can be viewed. Have students write a reflection using the worksheet in Appendix B.
Assessment
Use the checkpoints to provide feedback to students throughout the process. Monitor printmaking process. Use the rubric in Appendix C to formally assess finished artwork.
Artists or Works of Art Studied
-Zarina Hashmi, Atlas of My World https://www.sothebys.com/en/auctions/ecatalogue/lot.80.html/2008/indian-art-l08221
-Notes: Her art uses line to depict political borders. The work is geographical
-Paula Scher, U.S.A Extreme Weather 2015 https://www.curbed.com/2016/2/22/11094204/paula-scher-maps-us-new
-Notes: Abstract expression combining text and map imagery
-Barrett Lyon, The Opte Project
https://www.moma.org/learn/moma_learning/barrett-lyon-the-opte-project-mapping-the-internet-2003/
-Notes: Map like representation of the communications via the internet. Note that there are no boundaries
-Juan Downey, Map of America
https://www.moma.org/learn/moma_learning/juan-downey-map-of-america-1975/
-Notes: Symbolizes a unified South America, no boundaries of countries
References
Downey, J. (1975). Map of America. [Colored pencil, pencil, and acrylic on map on board]. MoMA. https://www.moma.org/learn/moma_learning/juan-downey-map-of-america-1975/
Hashimi, Z. (2001). Atlas of My World I-VI. [Woodcut]. Sotheby’s. https://www.sothebys.com/en/auctions/ecatalogue/lot.80.html/2008/indian-art-l08221
Lyon, B. (2003). The Opte Project [Digital print from photo file]. MoMA. https://www.moma.org/learn/moma_learning/barrett-lyon-the-opte-project-mapping-the-internet-2003/
Xie, J. (2006, February 26). Color By Number: The Gorgeous, Obsessive U.S. Maps of Paula Scher. Curbed. https://www.curbed.com/2016/2/22/11094204/paula-scher-maps-us-new